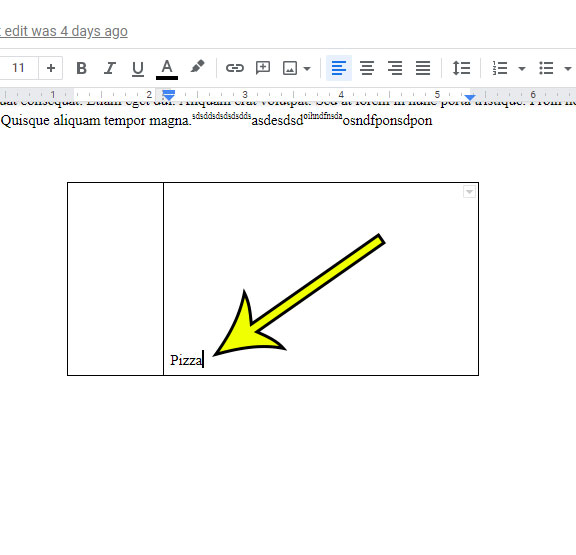
When you first add the table to your document, you are able to specify the number of columns and rows that you would like the table to have. But it’s very common to need to add more cells to a table, which could mean that you need to add more columns and rows to the table layout. The table editing tools in Google Docs provide you with a lot of ways to customize the way the table looks. Whether you want to edit the border, adjust the size of the cells, or adjust the alignment of the data in the table, you have options to do so. But if you haven’t worked with tables in Google Docs very often, or if you haven’t had a reason to try and edit tables in the application before, then it may be difficult to find all of those options. Our guide below will show you how to insert a new column in your Google Docs table so that you can modify the layout of your existing table data.
How to Add Another Table Column in Google Docs
Our article continues below with more information on adding columns to Google Docs tables, including pictures for these steps. Find out more about using page breaks in a Google document if you’ve been looking for a simple way to add pages in the middle of your documents.
How to Insert a Google Docs Table Column (Guide with Pictures)
The steps in this article were performed in the desktop version of the Google Chrome Web browser, but will also work in other desktop Web browsers like Firefox or Safari.
Step 1: Sign into Google Drive and open the document with the table.
Step 2: Click inside a cell in the column that is to the left or right of where you want to add the new column.
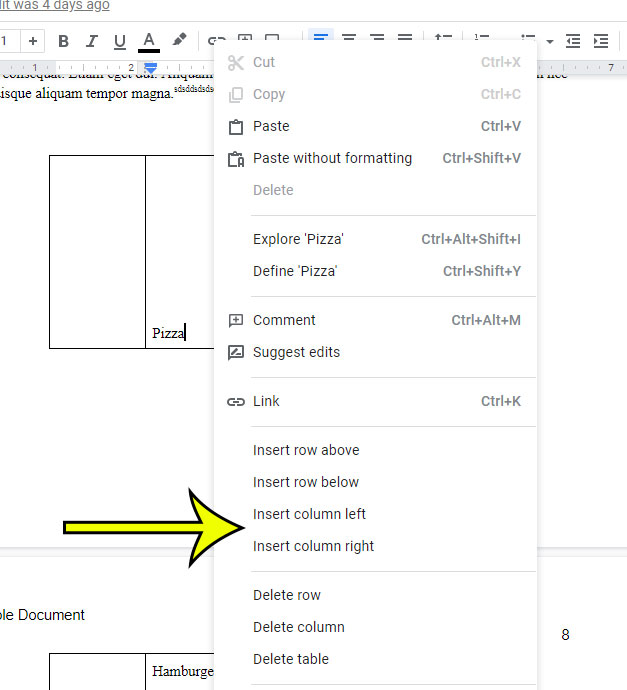
Step 3: Right-click in that cell, then choose the Insert column left or Insert column right option.
When you select the Insert column left or Insert column right option this is going to add a blank column in that location that includes the same number of rows as the other existing table columns. You can also add columns to your table by selecting the Format tab at the top of the window, choosing Table, then clicking the desired column insertion option. Table columns and rows can be removed in a similar manner as well. Simply select a cell in the table, then choose the appropriate Delete row or Delete column option to remove that entire range of cells.
How to Add a Column in Google Docs
Sometimes you are going to want to insert another column into a table in your Google doc, while other situations might call for you to insert columns for the entire document instead. You can learn how to insert a column in Google docs with the following steps: Note that this method lets you add more columns beyond the first column, but also lets you delete columns if you have more than you want in your document.
How to Add or Delete Row in a Google Docs Table
When you right click on a table in your document and select Insert row to add a row, there are a bunch of other options there, too. You can add another table row if you choose the Insert row above or the Insert row below option. You can also select Delete row from the format menu to remove an entire unwanted row from the table. Newer versions of Google docs have added even more features to this menu. You now have the option to distribute columns and rows so that they are all equally sized, and you can even pin header rows so that they appear at the top of every page where the table is.
More Information on How to Add a Column to a Table in Google Docs
Whether you elect to use the Format > Table option or the right click option to add another column to your table, it’s important to remember to put your cursor in a column that is next to where you wish to insert the new column. Otherwise, you will wind up with an empty column in the wrong part of the table and you will either need to Ctrl + Z to remove it, or select the new column and use one of the column deletion options. If you are trying to add another column to your Google Docs document, rather than adding a column to a table, then you can go to Format > Columns and choose the number of columns that you want your document to have. Note that existing document content will be readjusted to fit the new column layout, so you may need to make some adjustments after changing the number of document columns. You can perform some additional table formatting by selecting all of the table cells, then right-clicking on the table and select Table properties. There you will see options to adjust:
Table border – allows you to change the border color of the selected cells Cell background color – changes the background color of the selected cells Cell vertical alignment – lets you choose the vertical positioning of cell data Column width – specify the width of the selected columns Minimum row height – all rows will be at least as high as this setting Cell padding – the amount of blank space around the cell Table alignment – the table’s positioning on the page Left indent – how far the table is indented from the side of the page
I specify that you should select all of the cells first in the event that you want to make a change to the entire table. Otherwise, you would need to select a group of cells for which you wish to change one of those settings. Google Docs is going to change the setting for all of the cells that are selected, so make sure that you select all the cells you want to modify. When you right-click on the table to add a column, you probably also noticed an Insert row option. As you would expect, this is going to add a row above or below the currently selected cell. I’ve always preferred to add rows and columns in Google tables by using the options on the right click menu, so experiment with both options to determine which you prefer when you want to add a row or column. One final option of note on the right click menu is the Delete table option. If you select that it is going to delete the entire table and all of its data.
He specializes in writing content about iPhones, Android devices, Microsoft Office, and many other popular applications and devices. Read his full bio here.


