Occasionally Word 2013 may crash, your computer may turn off, or you mighty accidentally close a file without saving it. This can be a nightmare if you haven’t saved your work in a while, and can not only waste a lot of time as you recreate your work, but it can also be rather demoralizing. Fortunately, Word 2013 has an autosave feature that will automatically save your progress after a certain number of minutes have passed. But if you feel that these saves aren’t occurring often enough, you might be looking for a way to increase the autosave frequency in Word 2013. Our tutorial will show you where to find and adjust this setting.
How to Increase the Auto-Save Frequency in Word 2013
Our article continues below with additional information on changing how often Microsoft Word autosaves, including pictures of these steps.
How to AutoSave More Often in Word 2013 (Guide with Pictures)
The steps in this article were performed in Microsoft Word 2013, but will also work in other versions of Word, such as Word 2010 and Word 2016. You will be able to specify how often you want Word to automatically save the documents that you are currently working on. Note that this can affect the performance of Word if you have configured it to save very often and if the file that you are working on is very large in size.
Step 1: Open Microsoft Word 2013.
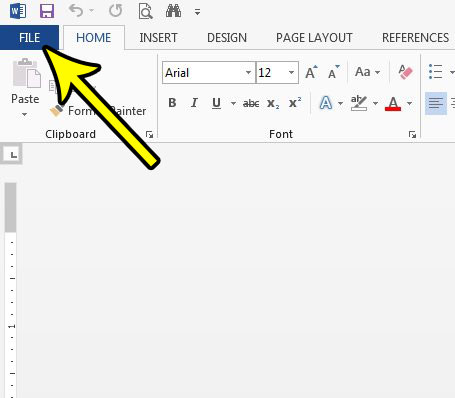
Step 2: Click the File tab at the top-left of the window.
Step 3: Click the Options button at the bottom of the column on the left side of the window.
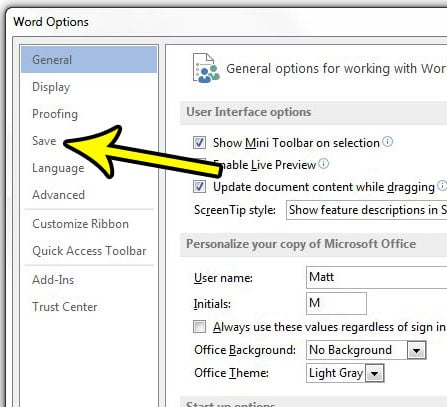
Step 3: Select the Save tab.
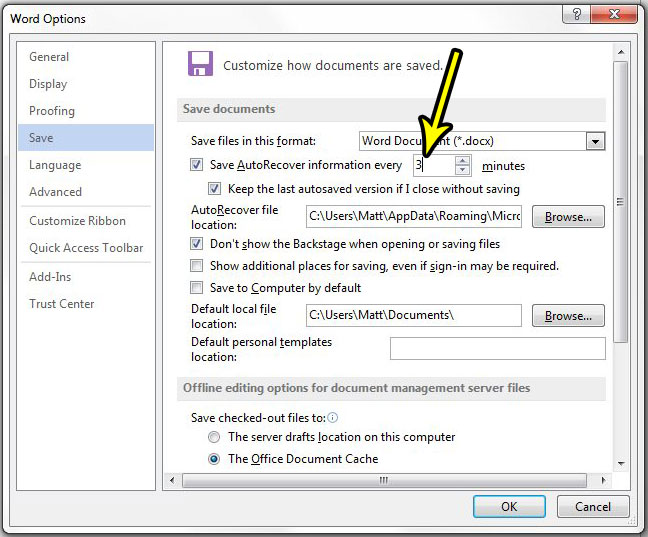
Step 4: Change the value in the Save AutoRecover information every field with the number of minutes that you want Word to wait before automatically saving your information. Click the OK button at the bottom of the window to apply your changes.
This Word Options dialog box where you find the AutoRecover options includes a lot of other useful information that you may wish to change as well. It’s worth looking through the menus here to see if you want to change some of the other default settings in Microsoft Word.
Can I Recover Unsaved Documents in Microsoft Word?
Sometimes you can get lucky and there will still be a temporary version of your Microsoft Word file that is saved, even if you never saved it. You can open Microsoft Word, click the File tab, then click the Info button. You can then click the Manage Versions button and click Recover Unsaved Documents option shown in the dropdown menu there. You will then see the unsaved documents that Word can restore, allowing you to click one of them, then click the Open button. In some newer versions of Microsoft Word you will need to click the Manage Document button instead of Manage Versions to be able to see the unsaved files that Microsoft Word can recover.
More Information on How to Adjust Word 2013 Autosave Frequency
Note that you can specify the location that Word uses for the versions of the file that it autosaves, as well as whether or not Word saves the last autosaved version if you close the file without saving it. Changing the autosave setting in Word will not affect the setting for other Microsoft Office applications like Excel or Powerpoint. If you want to adjust how often those programs autosave then you will need to repeat this process there as well. While autosave can be a very useful tool, it’s always a good idea to click Save (or to use the keyboard shortcut of Ctrl + S) periodically when editing a document, especially after you make a big or important change. Using one of those options to manually save a document is a good idea when working with any kind of file. Once you get in the habit of saving a Word document manually every few minutes you can minimize the amount of data that you lose in case something goes wrong. Do you often need to share your Word documents in different file formats? Find out how to save as a PDF in Word 2013 if you find that you are using other means for creating PDF files and are looking for a more convenient option.
Additional Reading
He specializes in writing content about iPhones, Android devices, Microsoft Office, and many other popular applications and devices. Read his full bio here.


