You can add gridlines or borders as needed in Excel, either from the Page Layout tab or the Home tab. If you need to remove lines, then you would go to the same spot. To stop Excel from printing lines you need to turn off gridlines by going to Page Layout and uncheck the Print check box under Gridlines. To stop Excel from printing borders you need to select the cells with borders, click the Home tab, then click the arrow next to Borders and choose the No Borders option. You may already know how to print lines in Excel 2013, which is one of the easiest ways to ensure that people reading your printed spreadsheets are able to properly distinguish individual cells. But occasionally you will create a spreadsheet that looks better when it is printed without gridlines or cell borders. Your Excel worksheet actually has two different settings that control whether or not cell lines are printed with the document, so you might be confused if you have already turned off the gridline setting, but are still seeing lines on your printed worksheets. When this occurs, it is because the worksheet also has cell borders. So if you want to print your document without lines of any kind, then you can follow the steps below.
How to Print Without Cell Borders in Excel 2013
Our article continues below with additional information on removing or hiding print lines in Excel, including pictures of these steps.
Guide to Removing Cell Borders in Excel 2013 (Steps with Pictures)
The steps below are going to stop gridlines from printing, and remove all of the borders from the cells in the worksheet. We used the 2013 version of Microsoft Office in this guide, but these steps also work in newer versions of Excel as well. As mentioned before, these are two separate settings for your worksheet, so you will need to make sure that they are both turned off if you do not want the cell lines to print along with your data.
Step 1: Open the file in Excel 2013.
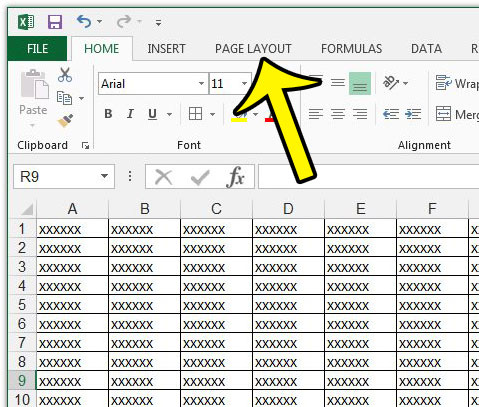
Step 2: Click the Page Layout tab at the top of the window.
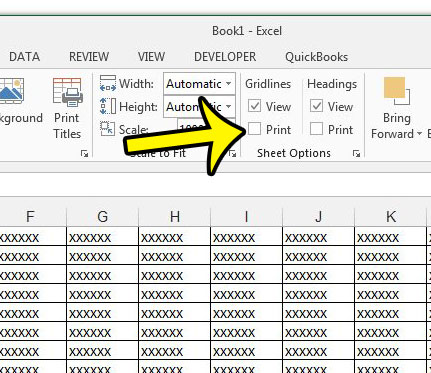
Step 3: Click the box to the left of Print under Gridlines in the Sheet Options section of the ribbon.
There should not be a check mark in that box if you want to print without any cell borders or gridlines. For example, gridlines will not print on this worksheet with the setting below.
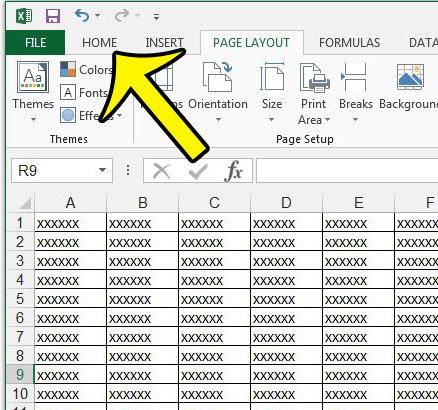
Step 4: Click the Home tab at the top of the window.
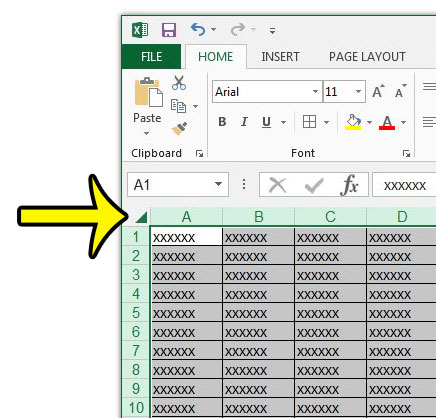
Step 5: Click the button above the row 1 heading, and to the left of the column A heading to select the entire worksheet.
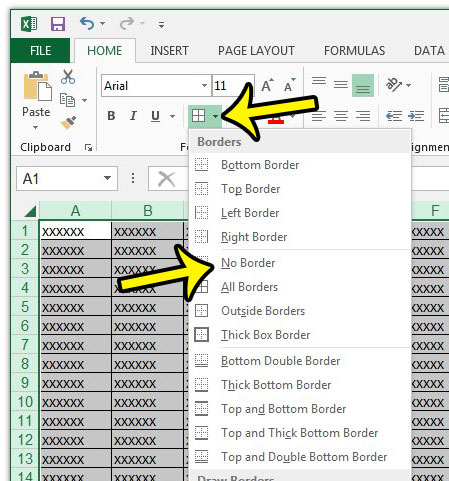
Step 6: Click the arrow to the right of the Borders button, then click the No Border option.
If you click the File tab then the Print button in the left column you can see the Print Preview section where you can confirm that you don’t see any printed gridlines or borders. Our tutorial continues below with additional discussion on changing the border and gridline settings in Microsoft Excel.
More Information on How to Get Rid of Print Lines in Excel
When you open the Print menu to see how your worksheet will look, there should no longer be any visible cell borders that print with your data. If you have followed the steps in our article above to remove borders from your cells, but you are still seeing lines when you print your spreadsheet, then you probably have gridlines enabled. You can stop gridlines from printing in Excel 2013 by selecting the Page Layout tab at the top of the window, then uncheck the box to the left of Print under the Gridlines section of the Sheet Options group. One other helpful printing option is the ability to set a print area in Excel 2013. This will allow you to choose only a certain part of your worksheet that you want to print. Another useful element of print areas is that you can use one if you need to print a blank grid of cells. Simply select the cells that you want to print, enable gridlines or add borders, then go to Page Layout > Print Area > and choose the Set Print Area option. You can then go to the Print menu and you will be able to see that you can print a range of cells even if they don’t contain any data. If you have enabled gridlines or added borders but still aren’t seeing them when you print, then one other thing to check is if you have a white background applied to any of your cells. You can check this by selecting your cells, opening the Home tab, then selecting the Fill Color button and choosing the No Fill option.
Additional Reading
He specializes in writing content about iPhones, Android devices, Microsoft Office, and many other popular applications and devices. Read his full bio here.
