Modern operating systems on computers and other electronic devices try to make common tasks as simple as possible. This often means placing important settings and programs in an easily-accessible location. In Windows 7, one such locations is called the taskbar. You’ve probably heard someone use the phrase Windows 7 taskbar at some point when referencing an item on your computer but, if you do not use it regularly, then it might just be an element of your computer that you ignore. However, the Windows 7 taskbar is the only element of your computer that is visible at almost all times, and this persistent visibility has its’ benefits. Among the benefits offered by the Windows 7 taskbar is the ability to add commonly used programs to the taskbar, which allows you to launch the programs that you use frequently with one mouse click. Combined with the system tray icons at the far right side of the taskbar and the options available on the Windows 7 taskbar’s shortcut menu, this is a handy tool for optimizing your Windows 7 desktop.
How to Add Icons to the Windows 7 Taskbar
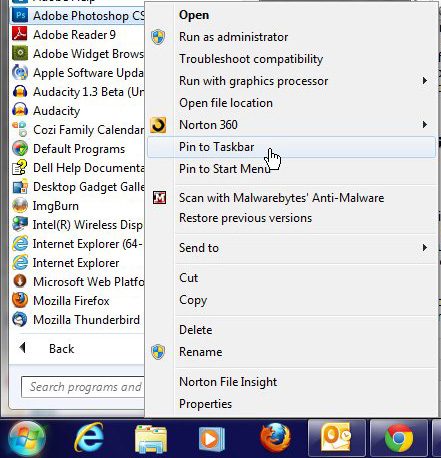
Even if you have never specifically added icons to your taskbar, you almost certainly have some icons there. A typical user will have an Internet Explorer icon, a Windows Explorer icon and a Windows Media Player icon, at the very minimum. But if you use a different Web browser, an email program, or any other program with any frequency, then you will appreciate having an icon for those programs in the taskbar as well. To add an icon for a program to the Windows 7 taskbar, you will need to click the Start button at the lower-left corner of your screen, click All Programs, then browse to the program whose icon you want to add. Right-click the program, then click the Pin to Taskbar button.
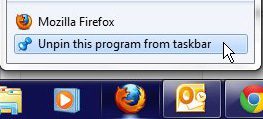
Conversely, if you want to remove a program icon from the Windows 7 taskbar, you can right-click the icon in the taskbar, then click the Unpin this program from taskbar option. You can even remove items from the taskbar that were there by default, such as the Windows Media Player icon.
How to Customize the Windows 7 Taskbar
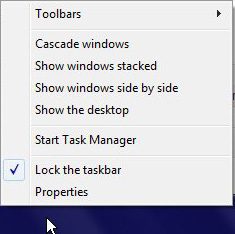
The Windows 7 taskbar also features its’ own shortcut menu that you can access by right-clicking in an open space on the taskbar. Once you have figure out how to find this menu, you will have the ability to customize the Windows 7 taskbar in a number of ways that can help to improve your Windows 7 experience.
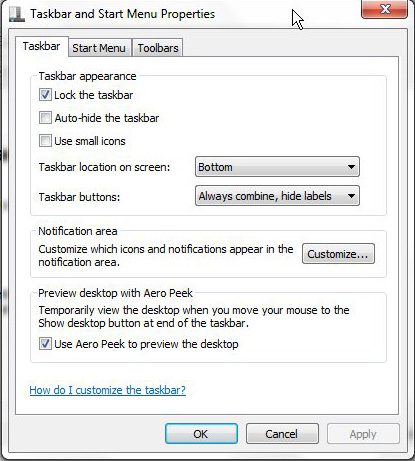
Customize the taskbar options by clicking the Properties option at the bottom of the shortcut menu. This will open a new Taskbar and Start Menu Properties pop-up window.
This menu allows you to change the appearance of the taskbar by clicking the box to the left of Lock the taskbar to remove the checkmark, then configuring the other options in the Taskbar appearance section of the window to customize the taskbar appearance. For example, if you wanted to use small icons and move the taskbar to the top of the screen, you would check the box to the left of Use small icons, then you would select Top from the drop-down menu to the right of Taskbar location on screen. Additionally, to further customize the taskbar, you can click the Customize button in the Notification area section of the menu, then you can specify how notifications should appear in the taskbar. Note that you have the ability to customize notification and icon behavior for each item that might appear in the system tray section of the taskbar. Is your Windows 7 taskbar located somewhere other than the bottom of the screen? Learn how to move the taskbar back to the bottom of the screen if you would prefer it to be located there, as it is in default Windows 7 installation. After receiving his Bachelor’s and Master’s degrees in Computer Science he spent several years working in IT management for small businesses. However, he now works full time writing content online and creating websites. His main writing topics include iPhones, Microsoft Office, Google Apps, Android, and Photoshop, but he has also written about many other tech topics as well. Read his full bio here.
You may opt out at any time. Read our Privacy Policy


